
Easy Chocolate Chip Scones: A Buttery, Light Breakfast Bake With a Biscuit-Like Crumb
A breakfast bake for cookie cravings
Chocolate chip scones sit in a sweet spot between a classic biscuit and a cookie-inspired breakfast treat. They’re slightly sweet and buttery, with a crumbly edge and tender interior—an appealing option when you want something quick to bake that still feels special. If you’ve ever wished chocolate chip cookies could pass as breakfast, this style of scone is designed for that exact moment: familiar chocolate flavor, but in a more breakfast-friendly format that pairs naturally with coffee.
What makes these scones especially approachable is how straightforward the process is. Even if you’ve never made scones at home, the method is simple: whisk the dry ingredients, work cold butter into the mixture, add buttermilk, shape the dough into a disc, cut, and bake. The technique is less about complicated steps and more about a few practical choices—like keeping butter cold and avoiding overworking the dough—that influence the final texture.
Scones vs. biscuits: similar, but not identical
It’s common to hear scones described as the British version of a biscuit, and the comparison is useful. Both rely on cold fat cut into flour to create layers, and both can be mixed quickly and baked into tender, structured rounds or wedges. The key difference often comes down to sweetness and richness. Scones generally include a bit more sugar than biscuits, and they frequently include eggs, which can add a richer mouthfeel.
However, there’s room to adapt. In this approach, the recipe is intentionally “Americanized” by omitting the egg. The result is a lighter, flakier texture—closer to a biscuit in its layering, but still clearly a scone thanks to the gentle sweetness and the chocolate chips. If you enjoy scones that feel airy rather than heavy, leaving out the egg is presented as a deliberate choice rather than a compromise.
Why this recipe feels easy (and why that matters)
Some baking projects feel intimidating because they appear to require precision, special equipment, or advanced technique. These chocolate chip scones are positioned differently: they’re meant to be accessible. The steps are familiar to anyone who has made biscuits, pie dough, or even quick breads. You’re not building a complex structure; you’re simply combining ingredients in a way that preserves cold butter pieces so they can create flaky layers in the oven.
That simplicity also makes this recipe a good candidate for repeat baking. Once you’ve made it once, it becomes easy to tweak details—like chip size, add-ins, or chilling time—based on your preferences and your kitchen conditions. Several home bakers note that even small changes can help with shape and texture, especially if you’re aiming for a neat wedge or a more defined rise.
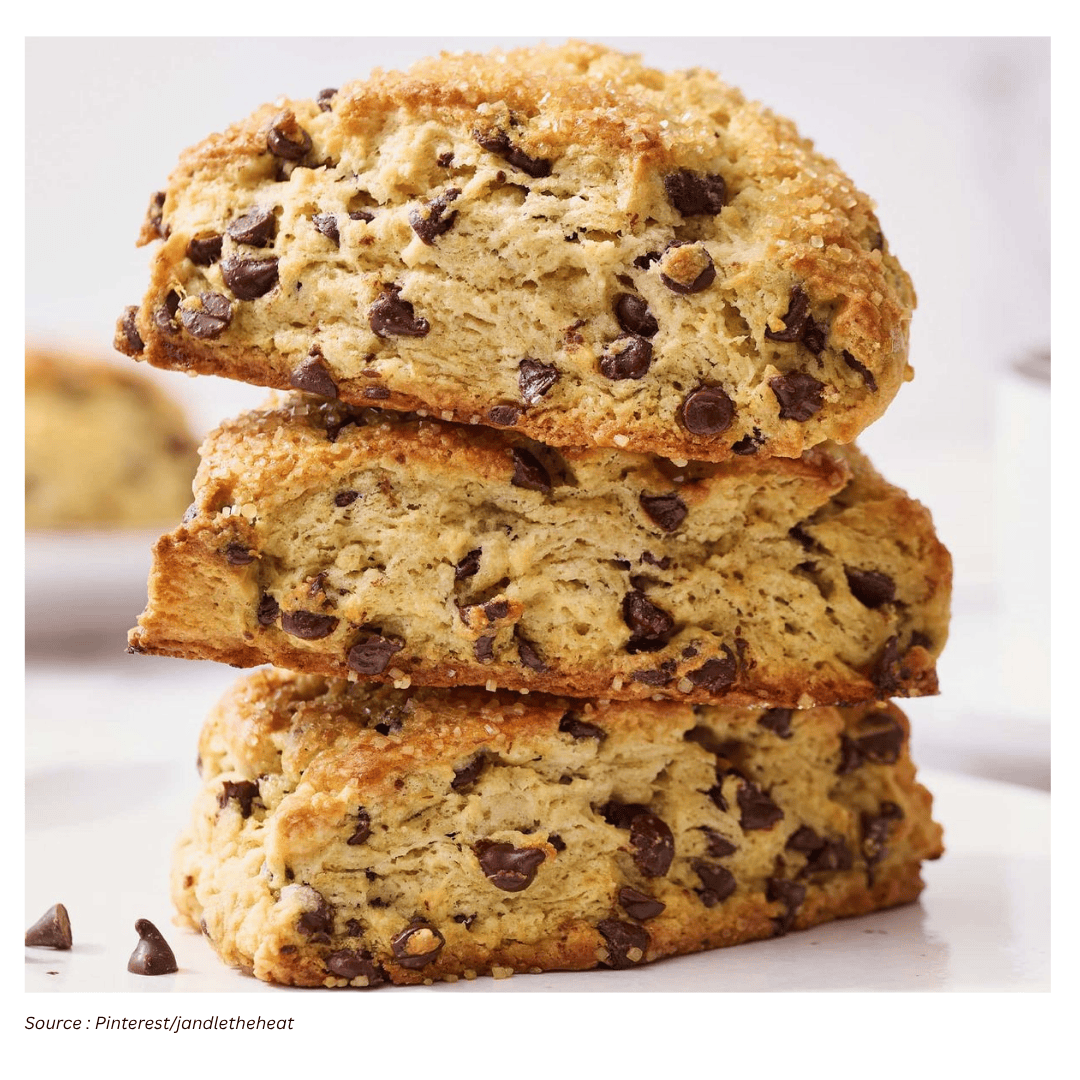
The core texture goal: flaky layers that melt in your mouth
The standout promise here is texture: flaky layers that “melt in your mouth,” with chocolate providing extra appeal. Achieving that flakiness depends less on any single ingredient and more on handling. Cold butter is central, and so is restraint. Overworking the dough can warm the butter and develop gluten, both of which can push the final result toward dense and bread-like rather than light and layered.
To help keep the butter cold and evenly distributed, it’s recommended to use a pastry cutter or even knives to cut the butter into the flour until it resembles small crumbs. This creates pockets of fat that release steam in the oven, encouraging lift and separation between layers. The goal isn’t to fully blend the butter into the flour; it’s to leave small pieces intact.
Buttermilk: what it does, and how to make a substitute
Buttermilk is part of what makes these scones feel tender and flavorful. If you don’t have buttermilk on hand, a simple at-home substitute is suggested: add 1 tablespoon of vinegar or lemon juice to 1 cup of milk, then let it stand at room temperature for 10 minutes. Once it rests, it’s ready to use. This is a practical tip for anyone who bakes occasionally and doesn’t want to buy buttermilk just for one recipe.
Buttermilk choice can also come up when bakers experiment with different flours. One question raised is whether whole-fat buttermilk is “wrong.” The guidance is clear: whole-fat buttermilk is fine. The bigger factor, in that case, is flour type—especially whole wheat flour, which absorbs more liquid than all-purpose flour.
Handling the dough: the biggest success factor
As with many baked goods that depend on flakiness, the instruction is to avoid overworking the dough. This is repeated as a general baking principle, but it’s particularly important here. The dough is shaped by hand into a disc—messy, yes, but worthwhile for the end result. Hand shaping also helps you stop mixing as soon as the dough holds together, rather than continuing to knead it on a surface.
Once the dough is formed into a disc, it’s cut to size and baked. The overall method is intentionally uncomplicated, which makes it easy to fit into a morning routine or a weekend baking session. The simplicity also invites small process upgrades if you want them, such as chilling the dough to improve shape.
Chilling and freezing: when it helps, and why
Temperature management shows up repeatedly as a way to improve results. The scones can be frozen either before baking or after baking, which makes them flexible for meal prep or entertaining. Freezing before baking can help maintain shape and support a better rise, since the butter stays colder longer as the oven heat begins to work.
For bakers who struggle with scones spreading or losing their clean lines, a short pre-bake chill is also mentioned: placing the scones in the freezer for about 15 minutes can help. Another baker notes they’ve read to chill the flour mixture before mixing and to chill again after cutting the triangles. While the exact chilling sequence can vary, the underlying idea is consistent: colder dough tends to bake up with better structure.
Chocolate chips: how much is “too much” is personal
Chocolate chips are the headline ingredient, but the comments around them reveal something important: preference varies. One baker felt there were too many chips for their taste and planned to use mini chips and reduce the quantity next time, while still praising the scone itself as “very good.” Another baker thought they might reduce chips next time, only to discover their family strongly disagreed and wanted the full amount.
That range of opinions suggests a useful approach: treat the chip quantity and chip size as adjustable. Mini chips can distribute more evenly, while larger chips create more pronounced pockets of chocolate. Some bakers also chop the chips to change how the chocolate shows up in each bite, noting that using a little less still produced a “great texture.”
Flavor tweaks people actually tried (without changing the basic method)
One of the most practical forms of feedback comes from bakers who made the recipe multiple times with different add-ins. The same base dough was used with chocolate chips, frozen blueberries, dried cranberries, and pecans. In some cases, they used 1 cup of a single mix-in, or split the total—half a cup of two ingredients, such as cranberries and toasted pecans. The consistent report was that people “go crazy for these scones,” including those who are typically skeptical of scones, and that the texture stayed light rather than dense.
Other variations mentioned include swapping semi-sweet chocolate chips when dark chocolate wasn’t available, using roasted pecans alongside a reduced amount of chocolate chips, or substituting brown sugar because of a preference for its flavor. Someone also noted adding extra vanilla—using two teaspoons instead of one simply because they had a bit left—and being happy with the result. These are not presented as required changes, but they show how forgiving the base recipe can be in real kitchens.
Flour and hydration: what changes when you use whole wheat
When bakers move away from all-purpose flour, the dough can behave differently. A specific issue raised is difficulty getting the dough consistency right when using whole wheat flour. The response points to a common baking reality: whole wheat flour absorbs more liquid than all-purpose flour. The practical fix offered is to add another 1–2 tablespoons of buttermilk as needed. This kind of adjustment can help the dough come together without excessive mixing, which is important for keeping the final scone light.
The takeaway is that if you change the flour, you may need to change the liquid slightly—but you don’t necessarily need to change the overall approach. The same principles still apply: keep butter cold, mix gently, and shape without overworking.
Baking and doneness: what to look for
Because ovens vary, baking time and browning can differ from kitchen to kitchen. One baker shared that they pulled their scones out four minutes early after noticing browning, and they came out perfectly. Another noted that every oven is different, reinforcing the idea that visual cues matter.
To check doneness, you can break one open. The interior shouldn’t be doughy or wet, but it should be slightly moist. This is a straightforward test that doesn’t require a thermometer and can be especially helpful if you’re learning how your oven handles pastries.
Texture expectations: flaky, but not everyone experiences it the same way
While the recipe aims for a flaky result, not every baker described the same texture. One person said their batch was “soft more like a muffin” and not as flaky as hoped, though still very good. In response, the question was raised: did you freeze the butter? That exchange highlights how much the butter temperature—and how it’s incorporated—can influence the final crumb.
Another baker described a different texture shift over time: when the scones are still warm, the texture can feel cake-like, but after cooling overnight, they become “not too crumbly” with a nice bite. That observation can be useful if you’re baking ahead for guests or planning to store leftovers.
Practical tips gathered from home bakers
Keep ingredients cold when possible. Cold butter is repeatedly emphasized, and a short freezer rest (about 15 minutes) can help the scones hold their shape.
Don’t overmix. Overworking the dough can reduce flakiness. Mix just until the dough comes together and then shape it gently by hand.
Adjust liquid for whole wheat flour. If using whole wheat flour, add about 1–2 tablespoons more buttermilk to reach the right consistency.
Use the chocolate format you like. Mini chips, chopped chips, or a slightly reduced amount can change the balance without changing the base recipe.
Use visual cues for baking. If the tops are browning sooner than expected, it can be reasonable to pull them a few minutes early, as long as the interior isn’t wet.
Buttermilk substitute is simple. If needed, mix 1 tablespoon vinegar or lemon juice with 1 cup milk and rest 10 minutes.
Serving ideas and why people keep coming back to this bake
These chocolate chip scones are often framed as a quick breakfast to enjoy with coffee, but the feedback suggests they also work well beyond a typical morning routine. One baker described them as a great gift, especially paired with cheese or jam. Others compared them favorably to grocery store or café scones, praising their lightness and flavor.
What stands out across the comments is consistency: multiple people report making them repeatedly, changing mix-ins, changing chip types, or adjusting sweetness, and still getting a result they’re excited to share. The base method—dry ingredients whisked, cold butter cut in, buttermilk added, dough shaped into a disc and cut—remains the steady foundation.
A simple formula worth keeping in rotation
In the end, the appeal of these easy chocolate chip scones is not that they’re complicated or trendy. It’s that they deliver on a classic promise: buttery, lightly sweet layers with enough chocolate to feel indulgent, while still being simple enough to bake without stress. If you want a homemade pastry that feels bakery-adjacent but fits into a normal schedule, this is the kind of recipe that earns a permanent spot in your breakfast rotation—especially once you learn the small handling habits that make the texture shine.